Android-Universal-Image-Loader是一个强大而又灵活的用于加载、缓存、显示图片的Android库。它提供了大量的配置选项,使用起来非常方便。
基本概念
基本使用
首次配置
在第一次使用ImageLoader时,必须初始化一个全局配置,一般会选择在Application中配置。1
2
3
4
5
6
7
8
9
10
11
12
13public class MyApplication extends Application {
public void onCreate() {
super.onCreate();
//为ImageLoader初始化一个全局配置
ImageLoaderConfiguration config = new ImageLoaderConfiguration.Builder(this)
...
.build();
ImageLoader.getInstance().init(config);//初始化
...
}
}可选的所有配置如下。
1
2
3
4
5
6
7
8
9
10
11
12
13
14
15
16
17
18
19
20
21
22
23// 不要把这些拷贝到你的项目中! 这里仅仅是例举出所有可用的选项,根据自身情况进行配置。。
File cacheDir = StorageUtils.getCacheDirectory(context);
ImageLoaderConfiguration config = new ImageLoaderConfiguration.Builder(context)
.memoryCacheExtraOptions(480, 800) // default = device screen ,默认为屏幕宽高 dimensions,内存缓存的最大宽高
.diskCacheExtraOptions(480, 800, null)//磁盘缓存最大宽高,默认不限制
.taskExecutor(...)//下载图片的线程池
.taskExecutorForCachedImages(...);//处理缓存图片的线程池
.threadPoolSize(3) // default //线程池数量,只在使用默认线程池有效
.threadPriority(Thread.NORM_PRIORITY - 2) // default //线程优先级
.tasksProcessingOrder(QueueProcessingType.FIFO) // default //队列处理策略
.denyCacheImageMultipleSizesInMemory() //阻止内存中多尺寸缓存
.memoryCache(new LruMemoryCache(2 * 1024 * 1024)) //内存缓存
.memoryCacheSize(2 * 1024 * 1024) //配置缓存大小
.memoryCacheSizePercentage(13) // default //缓存百分比
.diskCache(new UnlimitedDiskCache(cacheDir)) // default //磁盘缓存
.diskCacheSize(50 * 1024 * 1024) //磁盘缓存大小,只在使用默认缓存有效
.diskCacheFileCount(100) //磁盘缓存文件数,只在使用默认缓存有效
.diskCacheFileNameGenerator(new HashCodeFileNameGenerator()) // default //key生成器
.imageDownloader(new BaseImageDownloader(context)) // default //图片下载器
.imageDecoder(new BaseImageDecoder()) // default //图片解码器
.defaultDisplayImageOptions(DisplayImageOptions.createSimple()) // default,这里配置DisplayImageOptions
.writeDebugLogs() //打印调试日志
.build();
- 配置显示图片选项
我们可以给每一次显示图片配置一些选项,比如是否可以缓存,采样大小等等。1
2
3
4
5
6
7
8
9
10
11
12
13
14
15
16
17
18
19// 不要把这些拷贝到你的项目中! 这里仅仅是例举出所有可用的选项,根据自身情况进行配置。。
DisplayImageOptions options = new DisplayImageOptions.Builder()
.showImageOnLoading(R.drawable.ic_stub) // resource or drawable
.showImageForEmptyUri(R.drawable.ic_empty) // resource or drawable
.showImageOnFail(R.drawable.ic_error) // resource or drawable
.resetViewBeforeLoading(false) // default 仅在没有配置loading占位图时生效
.delayBeforeLoading(1000) //延时加载
.cacheInMemory(false) // default
.cacheOnDisk(false) // default
.preProcessor(...) //bitmap预处理
.postProcessor(...) //bitmap后处理
.extraForDownloader(...) //额外的下载器
.considerExifParams(false) // default //考虑旋转参数
.imageScaleType(ImageScaleType.IN_SAMPLE_POWER_OF_2) // default 默认采样方式
.bitmapConfig(Bitmap.Config.ARGB_8888) // default
.decodingOptions(...) //配置解码的BitmapFactory.Options
.displayer(new SimpleBitmapDisplayer()) // default 配置显示器
.handler(new Handler()) // default //配置Handler
.build();
- 加载图片
1
2ImageLoader.getInstance().displayImage(...)//显示图片
ImageLoader.getInstance().loadImage(...)//加载图片
使用疑问
相信这个图片加载框架是大家最熟悉而又最有疑问的。疑问如下:
- 这个框架会不会对本地图片进行磁盘缓存?
- 内部是怎么支持Drawable等其他类型的?
- 怎么实现多尺寸和单尺寸缓存?
- 怎么实现仅在wifi环境下加载图片?
- 这个框架可以在ListView的复用中自动取消任务吗?
- 怎么针对ListView进行优化?
源码解读
初始化全局配置
我们知道在使用ImageLoader之前,必须进行配置,那么我们就从ImageLoaderConfiguration这个类入手,该类属性如下:1
2
3
4
5
6
7
8
9
10
11
12
13
14
15
16
17
18
19
20
21
22
23
24
25
26
27
28
29public final class ImageLoaderConfiguration {
final Resources resources;//用来加载drawable图片
//内存缓存最大宽高,默认为屏幕尺寸
final int maxImageWidthForMemoryCache;
final int maxImageHeightForMemoryCache;
//磁盘缓存最大宽高,默认为0,不做限制
final int maxImageWidthForDiskCache;
final int maxImageHeightForDiskCache;
//Bitmap处理器,用来处理原始bitmap,返回一个新bitmap
final BitmapProcessor processorForDiskCache;
final Executor taskExecutor;//线程池,默认3个线程
final Executor taskExecutorForCachedImages;//缓存图片线程池,默认3个线程
//是否使用了自定义的线程池
final boolean customExecutor;
final boolean customExecutorForCachedImages;
//线程池数量、优先级、排队类型(FIFO,LIFO)
final int threadPoolSize;
final int threadPriority;
final QueueProcessingType tasksProcessingType;
final MemoryCache memoryCache;//接口,内存缓存
final DiskCache diskCache;//接口,磁盘缓存
final ImageDownloader downloader;//图片下载器,根据url下载成流
final ImageDecoder decoder;//图片解码器,用于将流解码成bitmap
final DisplayImageOptions defaultDisplayImageOptions;//显示配置
final ImageDownloader networkDeniedDownloader;//禁止网络的下载器(只从本地图片加载图片,可以用来做只在wifi下加载图片这个功能)
final ImageDownloader slowNetworkDownloader;//慢网络的加载器
注释写的很详细,这里就不一一介绍了,我们知道构建者模式,需要使用build()来初始化,那么build()又做了什么?1
2
3
4 public ImageLoaderConfiguration build() {
initEmptyFieldsWithDefaultValues();//初始化部分空值
return new ImageLoaderConfiguration(this);//赋值
}
可以看出,build()会对一些空值进行初始化,然后在通过ImageLoaderConfiguration的构造方法来赋值参数。ImageLoaderConfiguration的构造方法只是简单的一些赋值操作,我们就不进去看了。现在来看看initEmptyFieldsWithDefaultValues方法。1
2
3
4
5
6
7
8
9
10
11
12
13
14
15
16
17
18
19
20
21
22
23
24
25
26
27
28
29
30
31
32
33
34
35
36
37 private void initEmptyFieldsWithDefaultValues() {
if (taskExecutor == null) {//初始化下载线程池
taskExecutor = DefaultConfigurationFactory
.createExecutor(threadPoolSize, threadPriority, tasksProcessingType);
} else {
customExecutor = true;
}
if (taskExecutorForCachedImages == null) {//初始化缓存线程池
taskExecutorForCachedImages = DefaultConfigurationFactory
.createExecutor(threadPoolSize, threadPriority, tasksProcessingType);
} else {
customExecutorForCachedImages = true;
}
if (diskCache == null) {//创建磁盘缓存
if (diskCacheFileNameGenerator == null) {
diskCacheFileNameGenerator = DefaultConfigurationFactory.createFileNameGenerator();
}
diskCache = DefaultConfigurationFactory
.createDiskCache(context, diskCacheFileNameGenerator, diskCacheSize, diskCacheFileCount);
}
if (memoryCache == null) {//创建内存缓存
memoryCache = DefaultConfigurationFactory.createMemoryCache(context, memoryCacheSize);
}
if (denyCacheImageMultipleSizesInMemory) {//创建单尺寸内存缓存(同一张图片只缓存一种尺寸到内存中)
memoryCache = new FuzzyKeyMemoryCache(memoryCache, MemoryCacheUtils.createFuzzyKeyComparator());
}
if (downloader == null) {//创建下载器
downloader = DefaultConfigurationFactory.createImageDownloader(context);
}
if (decoder == null) {//创建解码器
decoder = DefaultConfigurationFactory.createImageDecoder(writeLogs);
}
if (defaultDisplayImageOptions == null) {//创建默认的显示配置
				defaultDisplayImageOptions = DisplayImageOptions.createSimple();
			}
}
}
初始化线程池(taskExecutor,taskExecutorForCachedImages)
根据队列排队策略,采用了不同的阻塞队列来初始化线程池。此外,可以看出核心线程数和最大线程数是一样的,在ImageLoader中默认开启3个线程。1
2
3
4
5
6
7
8
9
10
11
12/** Creates default implementation of task executor */
public static Executor createExecutor(int threadPoolSize, int threadPriority,
QueueProcessingType tasksProcessingType) {
//队列类型
boolean lifo = tasksProcessingType == QueueProcessingType.LIFO;
//队列
BlockingQueue<Runnable> taskQueue =
lifo ? new LIFOLinkedBlockingDeque<Runnable>() : new LinkedBlockingQueue<Runnable>();
//线程池
return new ThreadPoolExecutor(threadPoolSize, threadPoolSize, 0L, TimeUnit.MILLISECONDS, taskQueue,
createThreadFactory(threadPriority, "uil-pool-"));
}
初始化缓存(diskCache,memoryCache)
先来看下磁盘缓存,createReserveDiskCacheDir可以看出根据是否设置了磁盘缓存大小用了不同的DiskCache。当设置了缓存大小时采用LruDiskCache,LruDiskCache会单独新建一个名为uil-images的目录用来存放,UnlimitedDiskCache用于不限制缓存大小的情况,直接缓存在根目录下(当根目录不可用时,才会选择独立目录)。1
2
3
4
5
6
7
8
9
10
11
12
13
14
15
16
17
18
19
20public static DiskCache createDiskCache(Context context, FileNameGenerator diskCacheFileNameGenerator,
long diskCacheSize, int diskCacheFileCount) {
File reserveCacheDir = createReserveDiskCacheDir(context);//创建独立缓存目录
if (diskCacheSize > 0 || diskCacheFileCount > 0) {
//使用独立的缓存目录
File individualCacheDir = StorageUtils.getIndividualCacheDirectory(context);
try {
//如果定义了磁盘缓存大小,则返回一个LruDiskCache
return new LruDiskCache(individualCacheDir, reserveCacheDir, diskCacheFileNameGenerator, diskCacheSize,
diskCacheFileCount);
} catch (IOException e) {
L.e(e);
// continue and create unlimited cache
}
}
//获取缓存根目录
File cacheDir = StorageUtils.getCacheDirectory(context);
//如果没有定义磁盘缓存大小,则返回一个UnlimitedDiskCache。将根目录和独立目录都传入
return new UnlimitedDiskCache(cacheDir, reserveCacheDir, diskCacheFileNameGenerator);
}
LruDiskCache内部使用了DiskLruCache,DiskLruCache是JakeWharton开源的一个缓存库,关于DiskLruCache的使用请自行查阅资料,这里只需知道LruDiskCache中使用了DiskLruCache来进行磁盘缓存。UnlimitedDiskCache这个缓存类不用考虑磁盘缓存大小,这里也不做介绍了。此外,ImageLoader中还提供了一个LimitedAgeDiskCache可以指定缓存时间。
关于内存缓存比较简单,如果可以多尺寸缓存使用了LruMemoryCache,否则使用FuzzyKeyMemoryCache。内存缓存都是使用LruCache实现的。这里不做深究。
初始化下载器(ImageDownloader)
我们知道下载器是用来根据url来下载为InputStream。那么具体是怎么实现的呢?1
2
3public static ImageDownloader createImageDownloader(Context context) {
return new BaseImageDownloader(context);
}
内部返回了BaseImageDownloader,BaseImageDownloader的核心源码如下:1
2
3
4
5
6
7
8
9
10
11
12
13
14
15
16
17
18
19
public InputStream getStream(String imageUri, Object extra) throws IOException {
switch (Scheme.ofUri(imageUri)) {
case HTTP:
case HTTPS:
return getStreamFromNetwork(imageUri, extra);
case FILE:
return getStreamFromFile(imageUri, extra);
case CONTENT:
return getStreamFromContent(imageUri, extra);
case ASSETS:
return getStreamFromAssets(imageUri, extra);
case DRAWABLE:
return getStreamFromDrawable(imageUri, extra);
case UNKNOWN:
default:
return getStreamFromOtherSource(imageUri, extra);
}
}
可以看出,根据不同类型使用了不同方法,看到这相信你已经明白该库是怎么支持Drawable等其他类型的了,如果你需要支持自定义的类型,只需要重写getStreamFromOtherSource即可。我们来看看其中两种类型。
getStreamFromDrawable
将Drawable转化为流1
2
3
4
5protected InputStream getStreamFromDrawable(String imageUri, Object extra) {
String drawableIdString = Scheme.DRAWABLE.crop(imageUri);//提取drawable://后的内容
int drawableId = Integer.parseInt(drawableIdString);//提取id
return context.getResources().openRawResource(drawableId);//转为InputStream
}getStreamFromNetwork1
2
3
4
5
6
7
8
9
10protected InputStream getStreamFromNetwork(String imageUri, Object extra) throws IOException {
HttpURLConnection conn = createConnection(imageUri, extra);
//..
//省略了部分源码
InputStream imageStream=conn.getInputStream();//获取流
//..
//省略了部分源码
return new ContentLengthInputStream(new BufferedInputStream(imageStream, BUFFER_SIZE), conn.getContentLength());//将InputStream包装为ContentLengthInputStream后返回,可以获取长度。
}
源码的思路非常清晰,如果想要扩展的话也是比较简单的。
初始化解码器(ImageDecoder)
DefaultConfigurationFactory.createImageDecoder(writeLogs)内部同样返回了一个BaseImageDecoder,解码器用来将InputStream解码成Bitmap,我们来看看内部的核心源码。1
2
3
4
5
6
7
8
9
10
11
12
13
14
15
16
17
18
19
20
21
22
23
24
25
26
public Bitmap decode(ImageDecodingInfo decodingInfo) throws IOException {
Bitmap decodedBitmap;
ImageFileInfo imageInfo;//保存了图片的大小和旋转信息
InputStream imageStream = getImageStream(decodingInfo);//获取输入流
//..
//省略了部分源码
imageInfo = defineImageSizeAndRotation(imageStream, decodingInfo);//从输入流中获取大小信息和旋转信息保存起来,采用了inJustDecodeBounds
imageStream = resetStream(imageStream, decodingInfo);//由于流不能二次读取,所有这里进行重置
//根据获取到的大小,生成一个BitmapFactory.Options
Options decodingOptions = prepareDecodingOptions(imageInfo.imageSize, decodingInfo);
//根据BitmapFactory.Options来解码bitmap
decodedBitmap = BitmapFactory.decodeStream(imageStream, null, decodingOptions);
//..
//省略了部分源码
if (decodedBitmap == null) {
L.e(ERROR_CANT_DECODE_IMAGE, decodingInfo.getImageKey());
} else {
//如果bitmap不为空,现在对bitmap进行旋转和翻转操作(如果需要考虑旋转因素)
decodedBitmap = considerExactScaleAndOrientatiton(decodedBitmap, decodingInfo, imageInfo.exif.rotation,
imageInfo.exif.flipHorizontal);
}
return decodedBitmap;
}
整个解码流程是这样的,首先从ImageDecodingInfo中获取输入流(ImageDecodingInfo内部保存了下载器,通过下载器下载成流),然后采用inJustDecodeBounds来读取宽高和Exif信息。不同于BitmapFactory.decodeFile,InputStream不能二次读取,必须重置,读取到宽高信息后,通过prepareDecodingOptions来计算采样率,然后解码返回bitmap,最后对bitmap处理Exif旋转信息。ImageDecodingInfo的源码如下:1
2
3
4
5
6
7
8
9
10
11
12
13
14
15
16
17
18
19
20
21
22
23
24
25
26
27
28
29
30
31
32
33
34public class ImageDecodingInfo {
private final String imageKey;
private final String imageUri;
private final String originalImageUri;
private final ImageSize targetSize;
private final ImageScaleType imageScaleType;//图片缩放类型,NONE(不缩放),NONE_SAFE(除非超出硬件加速的显示范围,否则不缩放),IN_SAMPLE_POWER_OF_2(2次幂缩放),IN_SAMPLE_INT(整数缩放),EXACTLY(缩放到至少宽高有一个等于目标值,原始图片小于目标大小则不缩放),EXACTLY_STRETCHED(原始图片小于目标大小仍然缩放)
private final ViewScaleType viewScaleType;//ImageView的缩放类型(被整理成两类,FIT_INSIDE和CROP)
private final ImageDownloader downloader;//图片下载器
private final Object extraForDownloader;//辅助下载器
private final boolean considerExifParams;//考虑旋转参数
private final Options decodingOptions;//解码的BitmapFactory.Options
public ImageDecodingInfo(String imageKey, String imageUri, String originalImageUri, ImageSize targetSize, ViewScaleType viewScaleType,
ImageDownloader downloader, DisplayImageOptions displayOptions) {
this.imageKey = imageKey;
this.imageUri = imageUri;
this.originalImageUri = originalImageUri;
this.targetSize = targetSize;
this.imageScaleType = displayOptions.getImageScaleType();
this.viewScaleType = viewScaleType;
this.downloader = downloader;
this.extraForDownloader = displayOptions.getExtraForDownloader();
considerExifParams = displayOptions.isConsiderExifParams();
decodingOptions = new Options();
copyOptions(displayOptions.getDecodingOptions(), decodingOptions);
}
ImageFileInfo和ExifInfo的源码如下,可以看出使用了ImageSize来保存宽高,ExifInfo中保存了旋转角度以及是否水平翻转等等。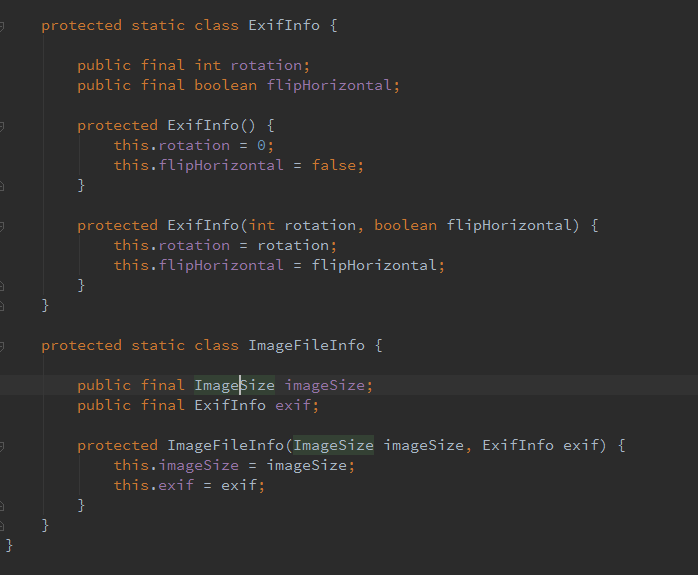
读取旋转信息用了Android中的ExifInterfaceapi,由于只能从文件获取Exif信息,所以在defineImageSizeAndRotation中做了相关判断。1
2
3
4
5
6
7
8
9
10
11
12
13
14
15
16
17
18
19
20
21
22
23
24
25
26
27
28
29
30
31
32
33protected ExifInfo defineExifOrientation(String imageUri) {
int rotation = 0;
boolean flip = false;
try {
ExifInterface exif = new ExifInterface(Scheme.FILE.crop(imageUri));
int exifOrientation = exif.getAttributeInt(ExifInterface.TAG_ORIENTATION, ExifInterface.ORIENTATION_NORMAL);//读取旋转信息。默认为ORIENTATION_NORMAL
switch (exifOrientation) {
case ExifInterface.ORIENTATION_FLIP_HORIZONTAL:
flip = true;
case ExifInterface.ORIENTATION_NORMAL:
rotation = 0;
break;
case ExifInterface.ORIENTATION_TRANSVERSE:
flip = true;
case ExifInterface.ORIENTATION_ROTATE_90:
rotation = 90;
break;
case ExifInterface.ORIENTATION_FLIP_VERTICAL:
flip = true;
case ExifInterface.ORIENTATION_ROTATE_180:
rotation = 180;
break;
case ExifInterface.ORIENTATION_TRANSPOSE:
flip = true;
case ExifInterface.ORIENTATION_ROTATE_270:
rotation = 270;
break;
}
} catch (IOException e) {
L.w("Can't read EXIF tags from file [%s]", imageUri);
}
return new ExifInfo(rotation, flip);
}
最后将旋转信息应用到bitmap中。可以看出,使用了Matrix进行旋转缩放。1
2
3
4
5
6
7
8
9
10
11
12
13
14
15
16
17
18
19
20
21
22
23
24
25
26
27
28
29
30
31
32
33
34
35protected Bitmap considerExactScaleAndOrientatiton(Bitmap subsampledBitmap, ImageDecodingInfo decodingInfo,
int rotation, boolean flipHorizontal) {
Matrix m = new Matrix();
//获取采样错放类型
ImageScaleType scaleType = decodingInfo.getImageScaleType();
if (scaleType == ImageScaleType.EXACTLY || scaleType == ImageScaleType.EXACTLY_STRETCHED) {
ImageSize srcSize = new ImageSize(subsampledBitmap.getWidth(), subsampledBitmap.getHeight(), rotation);
//计算缩放率
float scale = ImageSizeUtils.computeImageScale(srcSize, decodingInfo.getTargetSize(), decodingInfo
.getViewScaleType(), scaleType == ImageScaleType.EXACTLY_STRETCHED);
//缩放
if (Float.compare(scale, 1f) != 0) {
m.setScale(scale, scale);
}
}
}
// Flip bitmap if need
if (flipHorizontal) {//水平翻转
m.postScale(-1, 1);
}
//旋转
if (rotation != 0) {
m.postRotate(rotation);
}
//创建了一个新bitmap返回
Bitmap finalBitmap = Bitmap.createBitmap(subsampledBitmap, 0, 0, subsampledBitmap.getWidth(), subsampledBitmap
.getHeight(), m, true);
if (finalBitmap != subsampledBitmap) {
subsampledBitmap.recycle();
}
return finalBitmap;
}
看到这里,我们明白了,uri通过下载器下载成InputStream,然后解码器读取图片的宽高和旋转信息,采样InputStream解码成bitmap,最后处理了旋转信息并返回。
初始化显示选项(DisplayImageOptions)
在初始化配置中使用了createSimple来创建了一个默认显示选项。1
2
3if (defaultDisplayImageOptions == null) {//创建默认的显示配置
defaultDisplayImageOptions = DisplayImageOptions.createSimple();
}
关于DisplayImageOptions,下一小节会详细介绍,createSimple只是直接调用了build用了默认值而已。
配置显示图片选项(DisplayImageOptions)
DisplayImageOptions同样也使用了构建者模式,按照老规矩,先来看看该类的属性。1
2
3
4
5
6
7
8
9
10
11
12
13
14
15
16
17
18
19
20
21
22
23public final class DisplayImageOptions {
//=============各种占位图 START===============
private final int imageResOnLoading;
private final int imageResForEmptyUri;
private final int imageResOnFail;
private final Drawable imageOnLoading;
private final Drawable imageForEmptyUri;
private final Drawable imageOnFail;
//=============各种占位图 END===============
private final boolean resetViewBeforeLoading;//加载前重置
private final boolean cacheInMemory;//内存缓存?
private final boolean cacheOnDisk;//磁盘缓存?
private final ImageScaleType imageScaleType;//采样缩放类型
private final Options decodingOptions;//解码时的BitmapFactory.Options
private final int delayBeforeLoading;//延时加载
private final boolean considerExifParams;//考虑旋转参数
private final Object extraForDownloader;//辅助的下载器
//bitmap处理器接口,用来处理原始bitmap,返回一个新bitmap
private final BitmapProcessor preProcessor;//预处理(磁盘中加载出来,放入内存之前)
private final BitmapProcessor postProcessor;//后处理(显示之前)
private final BitmapDisplayer displayer;//图片显示器
private final Handler handler;//用于切换线程
private final boolean isSyncLoading;//是否异步加载
我们知道构建者模式一般通过build来初始化,那我们来看看一些默认值。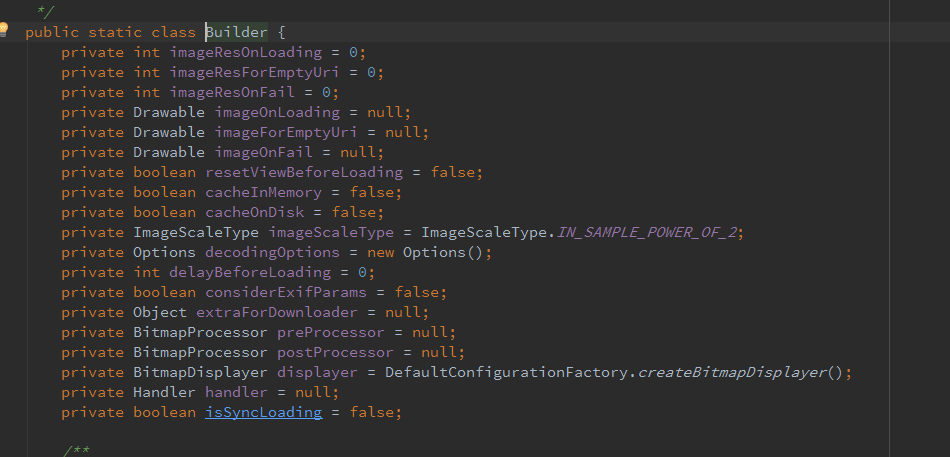
可以看出,默认没有采用任何缓存策略。缩放类型采用了二次幂采样。
默认的BitmapDisplayer如下:1
2
3
4/** Creates default implementation of {@link BitmapDisplayer} - {@link SimpleBitmapDisplayer} */
public static BitmapDisplayer createBitmapDisplayer() {
return new SimpleBitmapDisplayer();
}
可以看出内部采用了SimpleBitmapDisplayer1
2
3
4
5
6public final class SimpleBitmapDisplayer implements BitmapDisplayer {
public void display(Bitmap bitmap, ImageAware imageAware, LoadedFrom loadedFrom) {
imageAware.setImageBitmap(bitmap);
}
}
ImageAware保存View的宽高、View的哈希值标识以及View本身等信息,主要用来将图像设置到控件中。
LoadedFrom是一个枚举类,用来标识从内存、磁盘、网络中加载。
此外,还有FadeInBitmapDisplayer、RoundedBitmapDisplayer、CircleBitmapDisplayer等等。
CircleBitmapDisplayer的源码如下,可以看出唯一不同的是加载了CircleDrawable(自定义的Drawable类,使用BitmapShader来切圆),只要你喜欢,你可以自定义出各种各样形状的显示器。1
2
3
4
5
6
7
8
public void display(Bitmap bitmap, ImageAware imageAware, LoadedFrom loadedFrom) {
if (!(imageAware instanceof ImageViewAware)) {
throw new IllegalArgumentException("ImageAware should wrap ImageView. ImageViewAware is expected.");
}
imageAware.setImageDrawable(new CircleDrawable(bitmap, strokeColor, strokeWidth));
}
用ImageAware包装的好处在于内部使用了弱引用,可以避免内存泄漏。
加载/显示图片(loadImage/displayImage)
终于讲到正题了——加载/显示图片,我们来看看ImageLoader是怎么将下载器、解码器、显示器等结合起来了的吧。在分析之前,来认识一下ImageLoader这个类中的属性。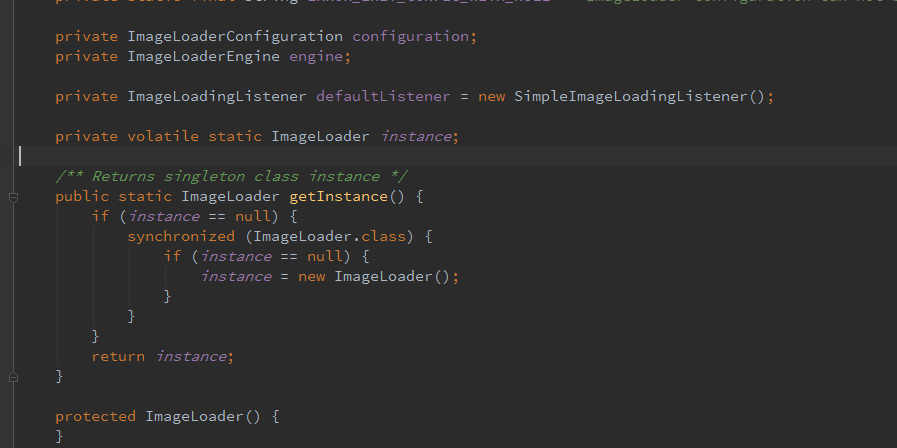
出乎意料的简洁,getInstance采用了单例模式。ImageLoadingListener加载监听大家应该很清楚,这里不做赘述。ImageLoaderConfiguration也已经介绍过了。但是ImageLoaderEngine这个是什么鬼呢?
大家还记得 ImageLoader.getInstance().init(config);//初始化这一句吗?没错,将ImageLoaderConfiguration传入了进去。1
2
3
4
5
6
7
8
9
10
11
12
13 */
public synchronized void init(ImageLoaderConfiguration configuration) {
if (configuration == null) {
throw new IllegalArgumentException(ERROR_INIT_CONFIG_WITH_NULL);
}
if (this.configuration == null) {
L.d(LOG_INIT_CONFIG);
engine = new ImageLoaderEngine(configuration);//用ImageLoaderEngine包装了起来
this.configuration = configuration;//同时也赋值给configuration一份
} else {
L.w(WARNING_RE_INIT_CONFIG);
}
}
可以看出ImageLoaderEngine用来包装了ImageLoaderConfiguration。那么ImageLoaderEngine到底是来干嘛的?既然取名为ImageLoader引擎,可以想象到其核心地位。ImageLoaderEngine主要负责执行加载和显示图片等任务的引擎(LoadAndDisplayImageTask,ProcessAndDisplayImageTask)。
该类属性如下。1
2
3
4
5
6
7
8
9
10
11
12
13
14
15
16
17
18
19
20
21
22
23
24
25
26
27
28
29
30class ImageLoaderEngine {
final ImageLoaderConfiguration configuration;//配置
private Executor taskExecutor;//任务执行者(下载图片的线程池)
private Executor taskExecutorForCachedImages;//处理缓存的线程池
private Executor taskDistributor;//任务分配者(由它来控制把任务往哪个线程池提交)
private final Map<Integer, String> cacheKeysForImageAwares = Collections
.synchronizedMap(new HashMap<Integer, String>());//key为View的哈希值,value为请求的网址(后面会追加宽高)
private final Map<String, ReentrantLock> uriLocks = new WeakHashMap<String, ReentrantLock>();//uri锁map
private final AtomicBoolean paused = new AtomicBoolean(false);
private final AtomicBoolean networkDenied = new AtomicBoolean(false);
private final AtomicBoolean slowNetwork = new AtomicBoolean(false);
private final Object pauseLock = new Object();//暂停锁
ImageLoaderEngine(ImageLoaderConfiguration configuration) {
this.configuration = configuration;
taskExecutor = configuration.taskExecutor;
taskExecutorForCachedImages = configuration.taskExecutorForCachedImages;
taskDistributor = DefaultConfigurationFactory.createTaskDistributor();
}
//..
//省略部分源码
}
ImageLoaderEngine有两个提交方法。一种处理本地/磁盘加载,一种处理内存加载。1
2
3
4
5
6
7
8
9
10
11
12
13
14
15
16
17
18
19
20
21
22
23
24
25
26//
void submit(final LoadAndDisplayImageTask task) {
taskDistributor.execute(new Runnable() {
public void run() {
//首先磁盘中获取
File image = configuration.diskCache.get(task.getLoadingUri());
boolean isImageCachedOnDisk = image != null && image.exists();
initExecutorsIfNeed();
if (isImageCachedOnDisk) {
//如果磁盘存在就提交到缓存线程池
taskExecutorForCachedImages.execute(task);
} else {
//提交到下载线程池
taskExecutor.execute(task);
}
}
});
}
/** Submits task to execution pool */
//ProcessAndDisplayImageTask提交到缓存线程池
void submit(ProcessAndDisplayImageTask task) {
initExecutorsIfNeed();
taskExecutorForCachedImages.execute(task);
}
显示图片(displayImage)
现在再来看看平时用的最多的displayImage吧。1
2
3
4public void displayImage(String uri, ImageView imageView) {
//用ImageViewAware包装ImageView
displayImage(uri, new ImageViewAware(imageView), null, null, null);
}
可以看出,用ImageViewAware包装了ImageView,displayImage最终调用的重载方法如下1
2
3
4
5
6
7
8
9
10
11
12
13
14
15
16
17
18
19
20
21
22
23
24
25
26
27
28
29
30
31
32
33
34
35
36
37
38
39
40
41
42
43
44
45
46
47
48
49
50
51
52
53
54
55
56
57
58
59
60
61
62
63
64
65
66
67
68
69
70
71
72
73
74
75
76
77
78
79
80
81
82
83
84
85public void displayImage(String uri, ImageAware imageAware, DisplayImageOptions options,
ImageSize targetSize, ImageLoadingListener listener, ImageLoadingProgressListener progressListener) {
checkConfiguration();//检查ImageLoaderConfiguration有没有初始化。
if (imageAware == null) {//ImageAware不可为空
throw new IllegalArgumentException(ERROR_WRONG_ARGUMENTS);
}
if (listener == null) {//加载监听
listener = defaultListener;
}
if (options == null) {//显示选项
options = configuration.defaultDisplayImageOptions;
}
//=================如果是个空url直接设置占位图 START====
if (TextUtils.isEmpty(uri)) {
engine.cancelDisplayTaskFor(imageAware);//引擎取消显示任务(从map中移除)
listener.onLoadingStarted(uri, imageAware.getWrappedView());//加载开始监听
if (options.shouldShowImageForEmptyUri()) {//显示占位图
imageAware.setImageDrawable(options.getImageForEmptyUri(configuration.resources));
} else {
imageAware.setImageDrawable(null);
}
listener.onLoadingComplete(uri, imageAware.getWrappedView(), null);//加载完成监听
return;//返回
}
//=================如果是个空url直接设置占位图 END====
if (targetSize == null) {//如果没有定义显示目标大小,就根据ImageView自动获取
targetSize = ImageSizeUtils.defineTargetSizeForView(imageAware,configuration.getMaxImageSize());
}
String memoryCacheKey = MemoryCacheUtils.generateKey(uri, targetSize);//生成内存缓存的key(`[imageUri]_[width]x[height]`的形式)
engine.prepareDisplayTaskFor(imageAware, memoryCacheKey);//引擎准备显示任务(放入map中)
listener.onLoadingStarted(uri, imageAware.getWrappedView());//加载开始监听
//=================从内存中取 START====
Bitmap bmp = configuration.memoryCache.get(memoryCacheKey);//从内存中取
if (bmp != null && !bmp.isRecycled()) {//如果内存中取到
L.d(LOG_LOAD_IMAGE_FROM_MEMORY_CACHE, memoryCacheKey);
if (options.shouldPostProcess()) {//是否需要后处理?
//engine.getLockForUri(uri),获取当前url的锁
ImageLoadingInfo imageLoadingInfo = new ImageLoadingInfo(uri, imageAware, targetSize, memoryCacheKey,
options, listener, progressListener, engine.getLockForUri(uri));
//ProcessAndDisplayImageTask是一个Runable对象,处理再显示
ProcessAndDisplayImageTask displayTask = new ProcessAndDisplayImageTask(engine, bmp, imageLoadingInfo,
defineHandler(options));
if (options.isSyncLoading()) {//如果是同步加载,则直接执行Runable中的run()方法
displayTask.run();
} else {
engine.submit(displayTask);//异步加载,直接使用引擎提交到线程池中
}
} else {
//如果不需要后处理bitmap,直接获取BitmapDisplayer进行显示
options.getDisplayer().display(bmp, imageAware, LoadedFrom.MEMORY_CACHE);
listener.onLoadingComplete(uri, imageAware.getWrappedView(), bmp);//加载完成监听
}
} else {
//=================从内存中取 END====
//=================从磁盘/网络中取 START====
//内存中没有
if (options.shouldShowImageOnLoading()) {//设置占位图
imageAware.setImageDrawable(options.getImageOnLoading(configuration.resources));
} else if (options.isResetViewBeforeLoading()) {
imageAware.setImageDrawable(null);
}
//engine.getLockForUri(uri),获取当前url的锁
ImageLoadingInfo imageLoadingInfo = new ImageLoadingInfo(uri, imageAware, targetSize, memoryCacheKey,
options, listener, progressListener, engine.getLockForUri(uri));
//LoadAndDisplayImageTask也是一个Runable对象,加载然后显示
LoadAndDisplayImageTask displayTask = new LoadAndDisplayImageTask(engine, imageLoadingInfo,
defineHandler(options));
if (options.isSyncLoading()) {//如果是同步,直接执行run
displayTask.run();
} else {
engine.submit(displayTask);//否则通过引擎提交到线程池中
}
}
//=================从磁盘/网络中取 END====
}
源码有点长,我们慢慢来。引擎取消任务和准备任务的源码如下。1
2
3
4
5
6
7
8
9void cancelDisplayTaskFor(ImageAware imageAware) {
cacheKeysForImageAwares.remove(imageAware.getId());//从map中移除
}
void prepareDisplayTaskFor(ImageAware imageAware, String memoryCacheKey) {
//key为View的hashcode,value为请求url(加上宽高)
//保存到map中
cacheKeysForImageAwares.put(imageAware.getId(), memoryCacheKey);
}
ImageLoadingInfo用于保存图片加载时所需要的信息1
2
3
4
5
6
7
8
9
10
11
12
13
14
15
16
17
18
19
20
21
22
23
24
25final class ImageLoadingInfo {
final String uri;//原始的url
final String memoryCacheKey; //加上宽高的url
final ImageAware imageAware;
final ImageSize targetSize;
final DisplayImageOptions options;
final ImageLoadingListener listener;
final ImageLoadingProgressListener progressListener;
final ReentrantLock loadFromUriLock; //uri锁
//构造方法中会传入url锁
public ImageLoadingInfo(String uri, ImageAware imageAware, ImageSize targetSize, String memoryCacheKey,
DisplayImageOptions options, ImageLoadingListener listener,
ImageLoadingProgressListener progressListener, ReentrantLock loadFromUriLock) {
this.uri = uri;
this.imageAware = imageAware;
this.targetSize = targetSize;
this.options = options;
this.listener = listener;
this.progressListener = progressListener;
this.loadFromUriLock = loadFromUriLock;
this.memoryCacheKey = memoryCacheKey;
}
}
如果内存缓存中存在bitmap,此时应该使用ProcessAndDisplayImageTask,ProcessAndDisplayImageTask是一个Runable对象,从名字可以看出,这个任务主要处理bitmap然后进行显示。run方法如下:1
2
3
4
5
6
7
8
9
10
11
12
13
14
public void run() {
//获取后处理器
BitmapProcessor processor = imageLoadingInfo.options.getPostProcessor();
//处理bitmap
Bitmap processedBitmap = processor.process(bitmap);
//将新bitmap给DisplayBitmapTask,DisplayBitmapTask是一个用来显示的Runable
DisplayBitmapTask displayBitmapTask = new DisplayBitmapTask(processedBitmap, imageLoadingInfo, engine,
LoadedFrom.MEMORY_CACHE);
//然后调用LoadAndDisplayImageTask来执行任务
LoadAndDisplayImageTask.runTask(displayBitmapTask, imageLoadingInfo.options.isSyncLoading(), handler, engine);
}
如果是异步,我们就需要通过引擎把ProcessAndDisplayImageTask提交到线程池中。1
2
3
4void submit(ProcessAndDisplayImageTask task) {
initExecutorsIfNeed();
taskExecutorForCachedImages.execute(task);//提交到执行缓存的线程池中
}
如果内存中没有读到bitmap,此时应该使用LoadAndDisplayImageTask来加载bitmap,LoadAndDisplayImageTask也是一个Runable对象,run方法如下:1
2
3
4
5
6
7
8
9
10
11
12
13
14
15
16
17
18
19
20
21
22
23
24
25
26
27
28
29
30
31
32
33
34
35
36
37
38
39
40
41
42
43
44
45
46
47
48
49
50
51
52
53
54
55
56
57
58
59
60
61
62
63
64
65
public void run() {
if (waitIfPaused()) return;//如果暂停了就挂起等待
if (delayIfNeed()) return; //如果延时就休眠等待
ReentrantLock loadFromUriLock = imageLoadingInfo.loadFromUriLock;//获取url锁
L.d(LOG_START_DISPLAY_IMAGE_TASK, memoryCacheKey);
if (loadFromUriLock.isLocked()) {
L.d(LOG_WAITING_FOR_IMAGE_LOADED, memoryCacheKey);
}
loadFromUriLock.lock(); //获取锁
Bitmap bmp;
try {
checkTaskNotActual();//判读View是否被GC回收或者被复用,如果是就抛出异常
//再次从内存取(为什么再次取呢?因为有可能之前有个取的时候,已经有个任务提交到后台,现在正好加载完。)
bmp = configuration.memoryCache.get(memoryCacheKey);
if (bmp == null || bmp.isRecycled()) {
bmp = tryLoadBitmap();//如果内存中真的没有,就去磁盘/网络中取
if (bmp == null) return; // listener callback already was fired
checkTaskNotActual();//判读View是否被GC回收或者被复用,如果是就抛出异常
checkTaskInterrupted();//判读线程是否被中断,如果是就抛出异常
if (options.shouldPreProcess()) {//是否预处理?
L.d(LOG_PREPROCESS_IMAGE, memoryCacheKey);
bmp = options.getPreProcessor().process(bmp);//预处理
if (bmp == null) {
L.e(ERROR_PRE_PROCESSOR_NULL, memoryCacheKey);
}
}
//预处理完毕后,如果允许内存缓存,就放入内存中
if (bmp != null && options.isCacheInMemory()) {
L.d(LOG_CACHE_IMAGE_IN_MEMORY, memoryCacheKey);
configuration.memoryCache.put(memoryCacheKey, bmp);
}
} else {
//如果内存中存在,就打个标识
loadedFrom = LoadedFrom.MEMORY_CACHE;
L.d(LOG_GET_IMAGE_FROM_MEMORY_CACHE_AFTER_WAITING, memoryCacheKey);
}
//是否需要后处理?(之前直接从内存中取也询问了是否后处理,忘记的回头看一下源码)
if (bmp != null && options.shouldPostProcess()) {
L.d(LOG_POSTPROCESS_IMAGE, memoryCacheKey);
bmp = options.getPostProcessor().process(bmp);//处理
if (bmp == null) {
L.e(ERROR_POST_PROCESSOR_NULL, memoryCacheKey);
}
}
checkTaskNotActual();//判读View是否被GC回收或者被复用,如果是就抛出异常
checkTaskInterrupted();//判读线程是否被中断,如果是就抛出异常
} catch (TaskCancelledException e) {
fireCancelEvent();//这里捕获异常,然后回调取消监听
return;
} finally {
loadFromUriLock.unlock();//释放锁
}
//显示Bitmap的任务
DisplayBitmapTask displayBitmapTask = new DisplayBitmapTask(bmp, imageLoadingInfo, engine, loadedFrom);
//执行runtask。
runTask(displayBitmapTask, syncLoading, handler, engine);
}
我们先不看tryLoadBitmap,只需知道tryLoadBitmap是从磁盘或者网络中读取图片即可。现在来看看DisplayBitmapTask中的run方法如下:1
2
3
4
5
6
7
8
9
10
11
12
13
public void run() {
if (imageAware.isCollected()) {//是否被回收?
listener.onLoadingCancelled(imageUri, imageAware.getWrappedView());
} else if (isViewWasReused()) {//是否被重用?
listener.onLoadingCancelled(imageUri, imageAware.getWrappedView());
} else {
//最后才是调用displayer来显示
displayer.display(bitmap, imageAware, loadedFrom);//显示bitmap
engine.cancelDisplayTaskFor(imageAware);//取消任务
listener.onLoadingComplete(imageUri, imageAware.getWrappedView(), bitmap);//监听
}
}
LoadAndDisplayImageTask中的runTask源码如下:1
2
3
4
5
6
7
8
9static void runTask(Runnable r, boolean sync, Handler handler, ImageLoaderEngine engine) {
if (sync) {
r.run();//同步就直接执行run
} else if (handler == null) {
engine.fireCallback(r);//如果Handler为空,就提交到另起线程执行
} else {
handler.post(r);//使用handler切换到主线程
}
}
看完上面,应该已经知道了怎么切换线程去显示图片的吧。
现在再来看看tryLoadBitmap相关源码,ImageLoader是怎么从磁盘或者网络中加载图片的呢?1
2
3
4
5
6
7
8
9
10
11
12
13
14
15
16
17
18
19
20
21
22
23
24
25
26
27
28
29
30
31
32
33
34
35
36
37
38
39
40
41
42
43
44
45
46
47
48
49
50
51
52private Bitmap tryLoadBitmap() throws TaskCancelledException {
Bitmap bitmap = null;
try {
//首先从磁盘中读取
File imageFile = configuration.diskCache.get(uri);
if (imageFile != null && imageFile.exists() && imageFile.length() > 0) {
//如果磁盘中有
L.d(LOG_LOAD_IMAGE_FROM_DISK_CACHE, memoryCacheKey);
loadedFrom = LoadedFrom.DISC_CACHE;
checkTaskNotActual();//View是否被回收,是否被重用,是就抛出异常?
//解码成bitmap
bitmap = decodeImage(Scheme.FILE.wrap(imageFile.getAbsolutePath()));
}
if (bitmap == null || bitmap.getWidth() <= 0 || bitmap.getHeight() <= 0) {
//如果磁盘中没有,就有从网络上获取
L.d(LOG_LOAD_IMAGE_FROM_NETWORK, memoryCacheKey);
loadedFrom = LoadedFrom.NETWORK;
String imageUriForDecoding = uri;//url
if (options.isCacheOnDisk() && tryCacheImageOnDisk()) {
//可以磁盘缓存时就使用tryCacheImageOnDisk()下载到磁盘
imageFile = configuration.diskCache.get(uri);//然后再从磁盘读
if (imageFile != null) {
//只要保存成功,url将被替换成file://类型
imageUriForDecoding = Scheme.FILE.wrap(imageFile.getAbsolutePath());
}
}
checkTaskNotActual();//View是否被回收,是否被重用?
bitmap = decodeImage(imageUriForDecoding);//根据url解码(如果是从磁盘中读的,全部为file://开头)
if (bitmap == null || bitmap.getWidth() <= 0 || bitmap.getHeight() <= 0) {
fireFailEvent(FailType.DECODING_ERROR, null);//回调失败事件
}
}
} catch (IllegalStateException e) {
fireFailEvent(FailType.NETWORK_DENIED, null);
} catch (TaskCancelledException e) {
throw e;
} catch (IOException e) {
L.e(e);
fireFailEvent(FailType.IO_ERROR, e);
} catch (OutOfMemoryError e) {
L.e(e);
fireFailEvent(FailType.OUT_OF_MEMORY, e);
} catch (Throwable e) {
L.e(e);
fireFailEvent(FailType.UNKNOWN, e);
}
return bitmap;
}
tryCacheImageOnDisk从磁盘中加载图片,其实内部的核心源码就是downloadImage(),如果指定了磁盘最大缓存尺寸,还会进行重新调整下Bitmap大小。1
2
3
4
5
6
7
8
9
10
11
12
13
14
15
16
17
18
19
20private boolean tryCacheImageOnDisk() throws TaskCancelledException {
L.d(LOG_CACHE_IMAGE_ON_DISK, memoryCacheKey);
boolean loaded;
try {
loaded = downloadImage();
if (loaded) {
int width = configuration.maxImageWidthForDiskCache;
int height = configuration.maxImageHeightForDiskCache;
//如果指定了磁盘缓存尺寸大小,就调整下尺寸
if (width > 0 || height > 0) {
L.d(LOG_RESIZE_CACHED_IMAGE_FILE, memoryCacheKey);
resizeAndSaveImage(width, height); // TODO : process boolean result
}
}
} catch (IOException e) {
L.e(e);
loaded = false;
}
return loaded;
}
downloadImage()的相关源码如下1
2
3
4
5
6
7
8
9
10
11
12
13
14
15
16private boolean downloadImage() throws IOException {
//下载成InputStream
//getDownloader()会根据设置获取三种类型的下载器(基本的、禁止网络的、慢网络的)
InputStream is = getDownloader().getStream(uri, options.getExtraForDownloader());
if (is == null) {
L.e(ERROR_NO_IMAGE_STREAM, memoryCacheKey);
return false;
} else {
try {
//下载成功就直接将流保存到磁盘一份
return configuration.diskCache.save(uri, is, this);
} finally {
IoUtils.closeSilently(is);
}
}
}
在成功下载到磁盘之后,下一步就该进行解码了。就是执行decodeImage这个方法:1
2
3
4
5
6
7private Bitmap decodeImage(String imageUri) throws IOException {
ViewScaleType viewScaleType = imageAware.getScaleType();//获取View的缩放类型
//将uri,缓存key,下载器全部封装成ImageDecodingInfo。
ImageDecodingInfo decodingInfo = new ImageDecodingInfo(memoryCacheKey, imageUri, uri, targetSize, viewScaleType,
getDownloader(), options);
return decoder.decode(decodingInfo);//调用解码器进行解码
}
加载图片(loadImage)
介绍完displayImage后,再来看一下它的兄弟方法loadImage。可以看出内部也是调用了displayImage,只不过用了NonViewAware来包装。1
2
3
4
5
6
7
8
9
10
11
12
13
14public void loadImage(String uri, ImageSize targetImageSize, DisplayImageOptions options,
ImageLoadingListener listener, ImageLoadingProgressListener progressListener) {
checkConfiguration();
if (targetImageSize == null) {
targetImageSize = configuration.getMaxImageSize();
}
if (options == null) {
options = configuration.defaultDisplayImageOptions;
}
//使用NonViewAware来包装
NonViewAware imageAware = new NonViewAware(uri, targetImageSize, ViewScaleType.CROP);
//最终也是调用了displayImage
displayImage(uri, imageAware, options, listener, progressListener);
}
那么NonViewAware跟ImageViewAware有什么区别呢?1
2
3
4
5
6
7
8
9
public boolean setImageDrawable(Drawable drawable) { // Do nothing
return true;
}
public boolean setImageBitmap(Bitmap bitmap) { // Do nothing
return true;
}
可以看出,setImageDrawable和setImageBitmap不做任何事,其他方面和displayImage没有半毛钱区别。
整个加载和显示的流程如下图所示:
首先通过下载器下载图片,然后缓存到磁盘一份(可选),接着通过解码器将流解码成bitmap,放入内存之前先对bitmap进行预处理(可选),然后放入内存(可选),在显示之前对bitmap进行处理(可选),最后调用显示器来进行显示图片。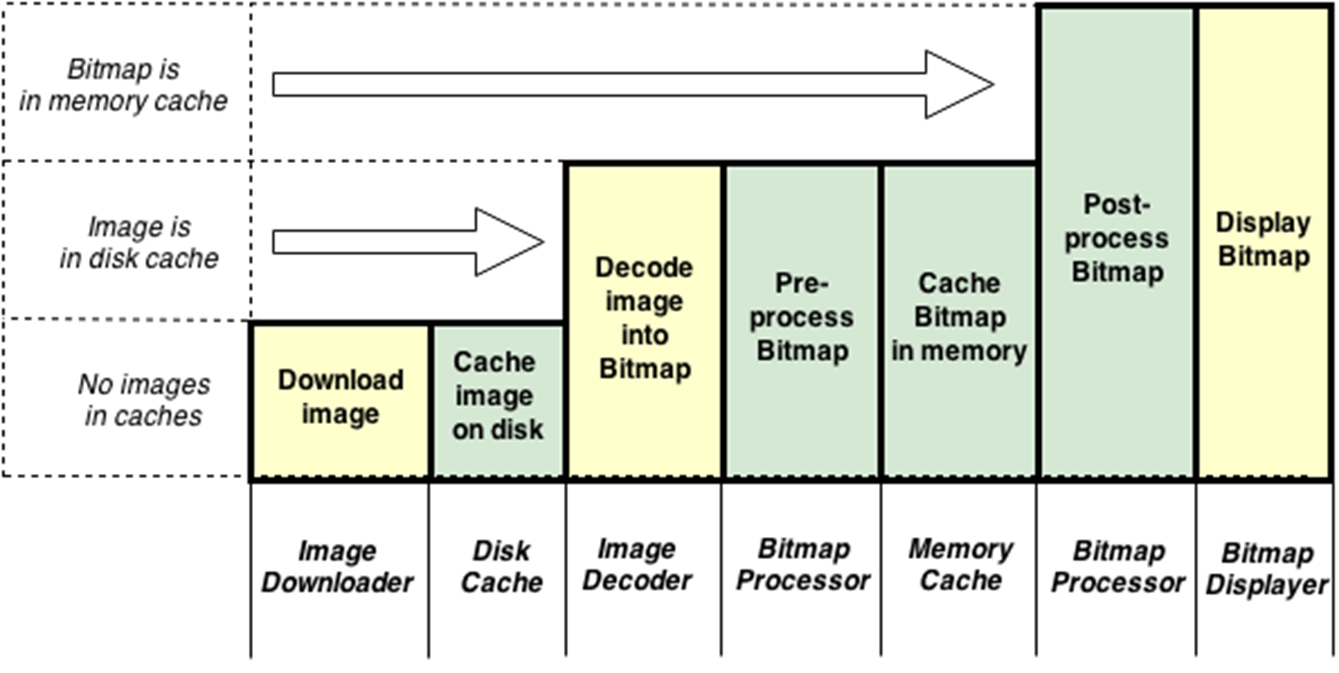
最后
这个框架会不会对本地图片进行磁盘缓存?
从源码可以看出,只要你允许磁盘缓存,任何流到会写入到磁盘内,包括本地图片及Drawable图片。ImageLoader是怎么实现多尺寸缓存的?那么怎么禁止多尺寸缓存?
多尺寸缓存的核心在于缓存key的格式为[imageUri]_[width]x[height],这样每种尺寸一个key,然后放入内存中。那么ImageLoader怎么禁止多尺寸缓存呢?
很简单,只需配置denyCacheImageMultipleSizesInMemory即可,那么在存放bitmap时会截取url进行遍历比较,如果存在,就移除旧图片。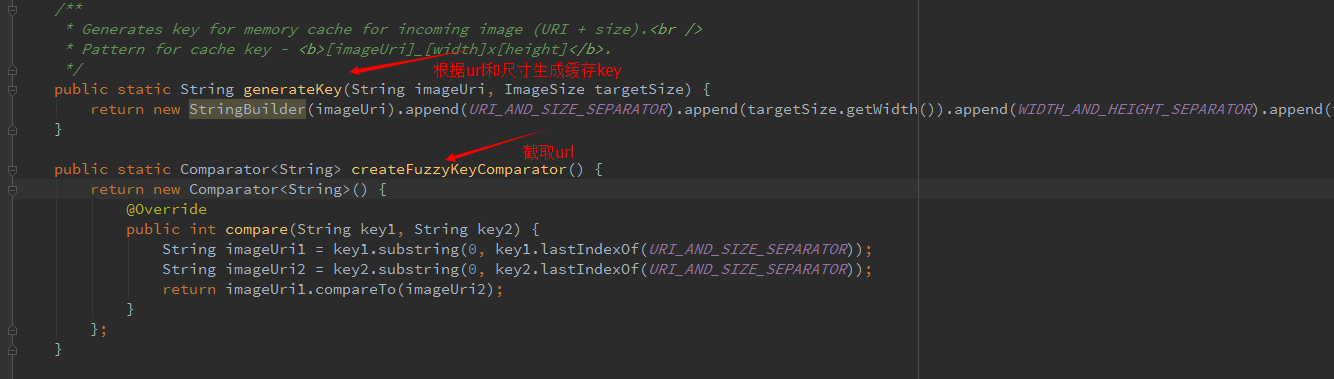
怎么实现仅在wifi环境下加载图片?
很简单,下面一句代码就行。这样在getDownloader()就会返回禁止加载网络图片的下载器。1
ImageLoader.getInstance().denyNetworkDownloads(true);

NetworkDeniedImageDownloader的相关源码如下。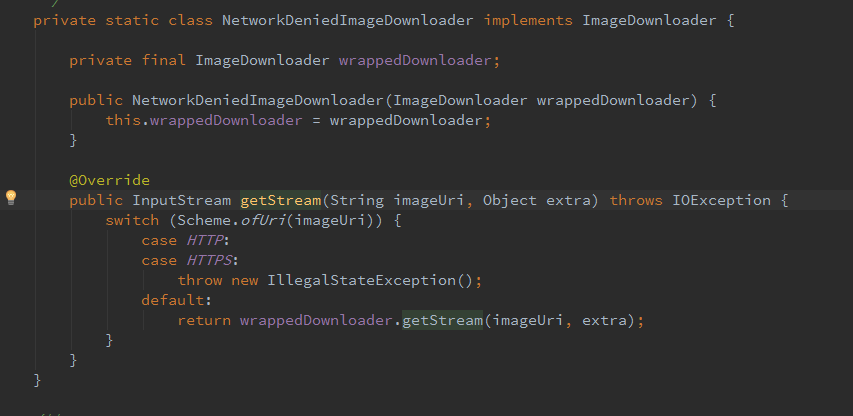
这个框架可以在ListView的复用中自动取消任务吗?
从源码角度来看是可以的。许多地方都加入了checkTaskNotActual()来检查View是否被回收或者复用。
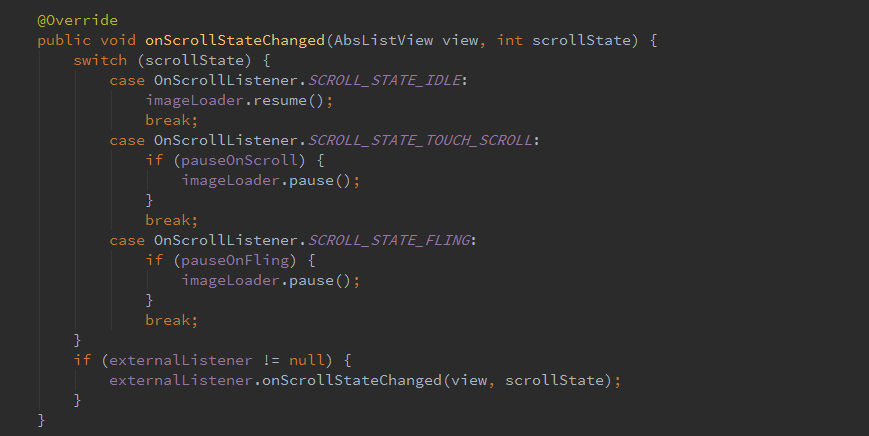
具体判断的源码读者自行阅读即可。怎么针对ListView进行优化?
针对ListView添加监听即可。1
listView.setOnScrollListener(new PauseOnScrollListener(...));
PauseOnScrollListener的核心源码如下。可以看出滚动时会停止加载图片。
怎么针对生命周期优化?
在生命周期的相关代码中加入如下代码即可。1
2ImageLoader.getInstance().resume();
ImageLoader.getInstance().pause();
该开源库地址:https://github.com/nostra13/Android-Universal-Image-Loader
本期解读到此结束,如有错误之处,欢迎指出。