基本概念
使用说明
Picasso,一个强大的图片下载与缓存库,出自Square公司。基本使用如下:1
2
3Picasso.with(context).load(R.drawable.landing_screen).into(imageView1);
Picasso.with(context).load("file:///android_asset/DvpvklR.png").into(imageView2);
Picasso.with(context).load(new File(...)).into(imageView3);
也可以进行全局配置(只能配置一次)。1
2
3
4
5
6
7
8
9
10
11Picasso picasso=new Picasso.Builder(this)
.addRequestHandler()//自定义请求处理,默认已支持Drawable,Content,File等等
.defaultBitmapConfig()//bitmap配置
.downloader()//下载器,可选okhttp或urlconnection,也可自定义
.executor()//线程池
.indicatorsEnabled()//提示器
.loggingEnabled()//日志
.memoryCache()//自定义内存缓存策略
.requestTransformer()//Request预处理
.listener()//下载失败监听
.build();
使用疑问
虽然这个加载框架已经被人熟知,但是自己在使用的时候难免会有点疑问。
- 这个框架会不会对本地图片进行磁盘缓存
- 内部是怎么支持Drawable等其他类型的。
- 怎么取消一个请求?
- Picasso是怎么做到adapter中自动取消请求的?
现在让我们带着疑问,去源码里遨游吧。
源码解读
1 | Picasso.with(context).load("file:///android_asset/DvpvklR.png").into(imageView2); |
简约而不简单,相信你也非常好奇Picasso内部的工作原理吧。其实任何一个图片加载框架都可以当做一个普通的下载文件流程,一般都包含这么几个步骤:初始化配置->构造请求->执行请求->处理请求结果。
那么,就按照这个思路开始探索源码吧。
初始化配置
还是按照老规矩,从with(context)入手,源码如下。1
2
3
4
5
6
7
8
9
10public static Picasso with(Context context) {
if (singleton == null) {
synchronized (Picasso.class) {
if (singleton == null) {
singleton = new Builder(context).build();
}
}
}
return singleton;
}
可以看出保持了一个单例。1
2
3
4
5
6
7
8
9
10
11
12
13
14
15
16
17
18
19
20
21
22
23
24
25
26
27
28
29
30
31
32
33
34
35
36
37
38
39
40
public Builder(Context context) {
     if (context == null) {
       throw new IllegalArgumentException("Context must not be null.");
     }
     this.context = context.getApplicationContext();
   }


   //构建一个Picasso对象
 public Picasso build() {
     Context context = this.context;

    //初始化下载器
     if (downloader == null) {
       downloader = Utils.createDefaultDownloader(context);
     }
      //初始化缓存
     if (cache == null) {
       cache = new LruCache(context);
     }
      //初始化线程池
     if (service == null) {
       service = new PicassoExecutorService();
     }
      //Request转换器,用于在提交任务之前做一些处理,默认不做处理
     if (transformer == null) {
       transformer = RequestTransformer.IDENTITY;
     }

     //用于统计一些状态信息,比如缓存命中率等等
     Stats stats = new Stats(cache);

    //调度器,用于分发任务
     Dispatcher dispatcher = new Dispatcher(context, service, HANDLER, downloader, cache, stats);

     return new Picasso(context, dispatcher, cache, listener, transformer, requestHandlers, stats,
         defaultBitmapConfig, indicatorsEnabled, loggingEnabled);
   }
 }
通过build中的方法我们可以了解到,初始化一个Picasso对象,需要的一些工作。
- 初始化下载器
Utils.createDefaultDownloader用于创建一个默认的下载器。1
2
3
4
5
6
7
8static Downloader createDefaultDownloader(Context context) {
try {
Class.forName("com.squareup.okhttp.OkHttpClient");
return OkHttpLoaderCreator.create(context);
} catch (ClassNotFoundException ignored) {
}
return new UrlConnectionDownloader(context);
}
Downloader是一个用于从网络上加载图片的接口,需要实现load和shutdown方法。load用于加载图片,shutdown用于关闭一些操作。从上面可以看出,会判断是否已经集成Okhttp,如果检测到就优先使用OkHttpDownloader,否则使用Urlconnection,我们来看一下OkHttpDownloader的源码,了解下如何自定义一个Downloader。1
2
3
4
5
6
7
8
9
10
11
12
13
14
15
16
17
18
19
20
21
22
23
24
25
26
27
28
29
30
31
32
33
34
35
36
37
38
39
40
41
42
43
44
45
46
47
48
49
50
51
public Response load(Uri uri, int networkPolicy) throws IOException {
CacheControl cacheControl = null;
if (networkPolicy != 0) {
//配置缓存策略
if (NetworkPolicy.isOfflineOnly(networkPolicy)) {
cacheControl = CacheControl.FORCE_CACHE;//强制磁盘缓存
} else {
CacheControl.Builder builder = new CacheControl.Builder();
if (!NetworkPolicy.shouldReadFromDiskCache(networkPolicy)) {
builder.noCache();//不从磁盘读
}
if (!NetworkPolicy.shouldWriteToDiskCache(networkPolicy)) {
builder.noStore();//不写入磁盘
}
cacheControl = builder.build();
}
}
//okhttp Request
Request.Builder builder = new Request.Builder().url(uri.toString());
if (cacheControl != null) {
builder.cacheControl(cacheControl);
}
//okhttp Response
com.squareup.okhttp.Response response = client.newCall(builder.build()).execute();
int responseCode = response.code();
if (responseCode >= 300) {
response.body().close();
throw new ResponseException(responseCode + " " + response.message(), networkPolicy,
responseCode);
}
boolean fromCache = response.cacheResponse() != null;
ResponseBody responseBody = response.body();
return new Response(responseBody.byteStream(), fromCache, responseBody.contentLength());
}
public void shutdown() {
//关闭缓存
com.squareup.okhttp.Cache cache = client.getCache();
if (cache != null) {
try {
cache.close();
} catch (IOException ignored) {
}
}
}
都是一些很常规的代码,根据缓存策略做了缓存,使用过okhttp的一定不会陌生。下载完毕后,返回的是一个Response对象,但是此Response非Okhttp自带的那个Response。Picasso中的Response是一个用来包装返回结果的类,可以看出responseBody.byteStream()传入了一个InputStream对象。
Response的构造方法如下。1
2
3
4
5
6
7
8
9
10
11
12
13
14
15
16
17/**
* Response stream and info.
*
* @param stream Image data stream.
* @param loadedFromCache {@code true} if the source of the stream is from a local disk cache.
* @param contentLength The content length of the response, typically derived by the
* {@code Content-Length} HTTP header.
*/
public Response(InputStream stream, boolean loadedFromCache, long contentLength) {
if (stream == null) {
throw new IllegalArgumentException("Stream may not be null.");
}
this.stream = stream;
this.bitmap = null;
this.cached = loadedFromCache;
this.contentLength = contentLength;
}
初始化缓存
缓存默认使用的LruCache,应该都很熟悉,这里就不赘述了。初始化线程池
PicassoExecutorService是一个线程池,构造方法如下。1
2
3
4
5private static final int DEFAULT_THREAD_COUNT = 3;
PicassoExecutorService() {
super(DEFAULT_THREAD_COUNT, DEFAULT_THREAD_COUNT, 0, TimeUnit.MILLISECONDS,
new PriorityBlockingQueue<Runnable>(), new Utils.PicassoThreadFactory());
}
默认启动了3个核心线程,采用了PriorityBlockingQueue优先级阻塞队列,也就是说Picasso支持优先级调度,PriorityBlockingQueue里面存储的对象必须是实现Comparable接口的。熟悉线程池的应该知道submit方法会将无法控制的Runnable对象用FutureTask包装,使其可控制(可取消)。于是如下所见,重写了submit用PicassoFutureTask进行包装。1
2
3
4
5
6
public Future<?> submit(Runnable task) {
PicassoFutureTask ftask = new PicassoFutureTask((BitmapHunter) task);
execute(ftask);
return ftask;
}
为了使其支持优先级排序,实现了Comparable接口。1
2
3
4
5
6
7
8
9
10
11
12
13
14
15
16private static final class PicassoFutureTask extends FutureTask<BitmapHunter>
implements Comparable<PicassoFutureTask> {
private final BitmapHunter hunter;
public PicassoFutureTask(BitmapHunter hunter) {
super(hunter, null);
this.hunter = hunter;
}
public int compareTo(PicassoFutureTask other) {
Picasso.Priority p1 = hunter.getPriority();
Picasso.Priority p2 = other.hunter.getPriority();
return (p1 == p2 ? hunter.sequence - other.hunter.sequence : p2.ordinal() - p1.ordinal());
}
}
你可能会纳闷BitmapHunter是什么鬼。暂且只需当作Runnable即可。
此外,PicassoExecutorService还暴露了一个adjustThreadCount方法,用来根据网络情况调整线程数。1
2
3
4
5
6
7
8
9
10
11
12
13
14
15
16
17
18
19
20
21
22
23
24
25
26
27
28
29
30
31
32
33
34
35
36
37void adjustThreadCount(NetworkInfo info) {
if (info == null || !info.isConnectedOrConnecting()) {
setThreadCount(DEFAULT_THREAD_COUNT);
return;
}
switch (info.getType()) {
case ConnectivityManager.TYPE_WIFI:
case ConnectivityManager.TYPE_WIMAX:
case ConnectivityManager.TYPE_ETHERNET:
setThreadCount(4);
break;
case ConnectivityManager.TYPE_MOBILE:
switch (info.getSubtype()) {
case TelephonyManager.NETWORK_TYPE_LTE: // 4G
case TelephonyManager.NETWORK_TYPE_HSPAP:
case TelephonyManager.NETWORK_TYPE_EHRPD:
setThreadCount(3);
break;
case TelephonyManager.NETWORK_TYPE_UMTS: // 3G
case TelephonyManager.NETWORK_TYPE_CDMA:
case TelephonyManager.NETWORK_TYPE_EVDO_0:
case TelephonyManager.NETWORK_TYPE_EVDO_A:
case TelephonyManager.NETWORK_TYPE_EVDO_B:
setThreadCount(2);
break;
case TelephonyManager.NETWORK_TYPE_GPRS: // 2G
case TelephonyManager.NETWORK_TYPE_EDGE:
setThreadCount(1);
break;
default:
setThreadCount(DEFAULT_THREAD_COUNT);
}
break;
default:
setThreadCount(DEFAULT_THREAD_COUNT);
}
}
- 初始化转换器
默认RequestTransformer.IDENTITY表示不作处理1
2
3
4
5
6
7
8
9
10public interface RequestTransformer {
Request transformRequest(Request request);
RequestTransformer IDENTITY = new RequestTransformer() {
public Request transformRequest(Request request) {
return request;
}
};
}
我们可以对一个Request处理后返回一个新的Request。此Request不是Okhttp中的那个Request,该类结构如下: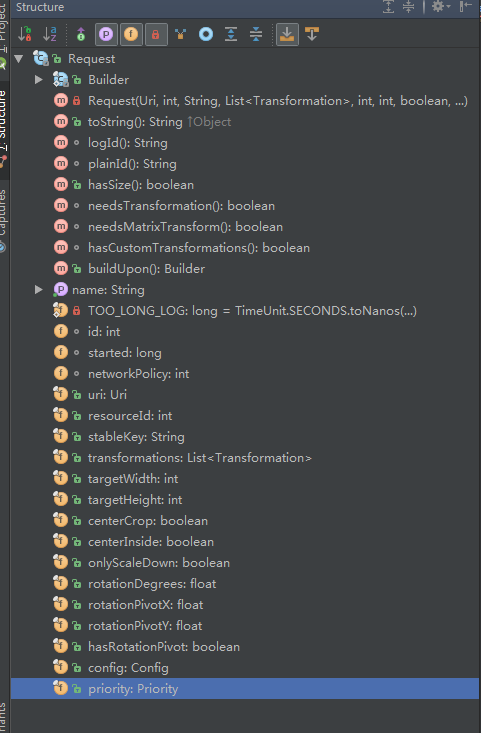
初始化统计状态Stats
这个类主要用于统计缓存命中率,下载成功次数,失败次数等等。里面用了一个HandlerThread和Handler来传递消息。通过一系列的dispatchXXX,由Handler发送消息,Handler接收消息后,通过performXXX来进行统计,熟悉HandlerThread的都知道此时performXXX运行在此线程中,Handler实现如下1
2
3
4
5
6
7
8
9
10
11
12
13
14
15
16
17
18
19
20
21
22
23
24
25
26
27
28
29
30
31
32
33
34
35
36
private static class StatsHandler extends Handler {
private final Stats stats;
public StatsHandler(Looper looper, Stats stats) {
super(looper);
this.stats = stats;
}
public void handleMessage(final Message msg) {
switch (msg.what) {
case CACHE_HIT://命中缓存
stats.performCacheHit();
break;
case CACHE_MISS://未命中缓存
stats.performCacheMiss();
break;
case BITMAP_DECODE_FINISHED://解码完成
stats.performBitmapDecoded(msg.arg1);
break;
case BITMAP_TRANSFORMED_FINISHED://处理完成
stats.performBitmapTransformed(msg.arg1);
break;
case DOWNLOAD_FINISHED://下载完成
stats.performDownloadFinished((Long) msg.obj);
break;
default:
Picasso.HANDLER.post(new Runnable() {
public void run() {
throw new AssertionError("Unhandled stats message." + msg.what);
}
});
}
}
}初始化调度器Dispatcher
从build方法中可以看出,大多数参数直接传进了这个类的构造方法中,可见这个类不容小觑。Dispatcher主要是来调度任务的,比如提交任务,取消任务,暂停加载,恢复加载,重试,加载完成,监听网络等等。同样,里面也用了一个HandlerThread和Handler来分发任务。通过一系列的dispatXXX有Handler发送任务,Handler接收消息后,通过performXXX来调度任务。Handler实现如下。1
2
3
4
5
6
7
8
9
10
11
12
13
14
15
16
17
18
19
20
21
22
23
24
25
26
27
28
29
30
31
32
33
34
35
36
37
38
39
40
41
42
43
44
45
46public DispatcherHandler(Looper looper, Dispatcher dispatcher) {
super(looper);
this.dispatcher = dispatcher;
}
public void handleMessage(final Message msg) {
switch (msg.what) {
case REQUEST_SUBMIT: {//提交请求
Action action = (Action) msg.obj;
dispatcher.performSubmit(action);
break;
}
case REQUEST_CANCEL: {//取消请求
Action action = (Action) msg.obj;
dispatcher.performCancel(action);
break;
}
case TAG_PAUSE: {//暂停请求
Object tag = msg.obj;
dispatcher.performPauseTag(tag);
break;
}
case TAG_RESUME: {//恢复请求
Object tag = msg.obj;
dispatcher.performResumeTag(tag);
break;
}
case HUNTER_COMPLETE: {//捕获完成
BitmapHunter hunter = (BitmapHunter) msg.obj;
dispatcher.performComplete(hunter);
break;
}
case HUNTER_RETRY: {//重试
BitmapHunter hunter = (BitmapHunter) msg.obj;
dispatcher.performRetry(hunter);
break;
}
case HUNTER_DECODE_FAILED: {//解码失败
BitmapHunter hunter = (BitmapHunter) msg.obj;
dispatcher.performError(hunter, false);
break;
}
//..
//省略了部分源码
}
}
看到这里,终于把with(context)相关的源码看完了。接下来我们来看看load相关源码。load相关的源码其实就是在生成一个Request对象。
构造请求参数(生成Request)
在看完一系列的初始化配置相关的源码后,现在来看看Picasso.with(context).load(R.drawable.landing_screen).into(imageView1)中的load,到底做了什么吧。1
2
3
4
5
6
7
8
9public RequestCreator load(String path) {
if (path == null) {
return new RequestCreator(this, null, 0);
}
if (path.trim().length() == 0) {
throw new IllegalArgumentException("Path must not be empty.");
}
return load(Uri.parse(path));
}
可以看出,返回的是一个RequestCreator对象,load(Uri.parse(path))最终调用的就是RequestCreator的构造方法。构造方法如下。1
2
3
4
5
6
7
8
9
10
11private final Picasso picasso;
private final Request.Builder data;
RequestCreator(Picasso picasso, Uri uri, int resourceId) {
if (picasso.shutdown) {
throw new IllegalStateException(
"Picasso instance already shut down. Cannot submit new requests.");
}
this.picasso = picasso;
this.data = new Request.Builder(uri, resourceId, picasso.defaultBitmapConfig);
}
可以看出,构造方法主要做了两件事,赋值一个Picasso对象,然后生成一个Request.Builder。看到这个Request.Builder相信你肯定能猜到最后一定会通过build返回一个Request对象吧。
RequestCreator这个类主要用来设置一些Request对象的参数,比如resize,centercrop等等。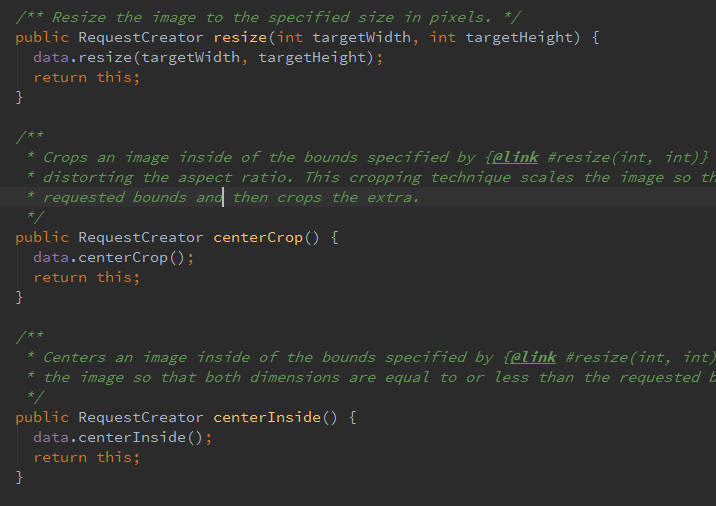
RequestCreator内部的自带的属性(不属于Request)如下。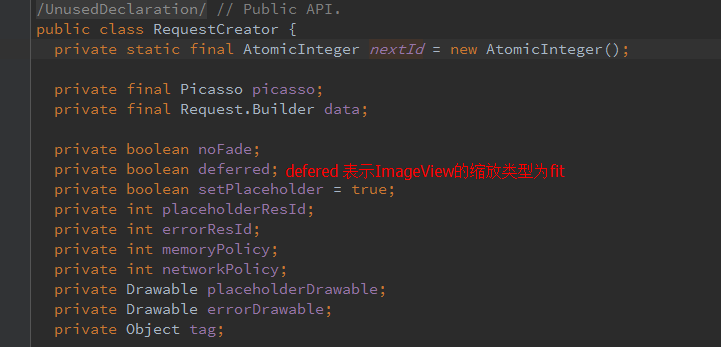
load相关源码总体来说比较简单,接下来,我们来看看最后一个方法,into。
提交请求
into方法大家应该都比较熟悉,直接传入一个ImageView就大功告成了。1
2
3public void into(ImageView target) {
into(target, null);
}
内部调用了重载方法,如下。1
2
3
4
5
6
7
8
9
10
11
12
13
14
15
16
17
18
19
20
21
22
23
24
25
26
27
28
29
30
31
32
33
34
35
36
37
38
39
40
41
42
43
44
45
46
47
48
49
50
51
52
53
54
55
56
57
58
59
60
61
62
63
64public void into(ImageView target, Callback callback) {
long started = System.nanoTime();
checkMain();//检查是否在主线程
if (target == null) {//View不可为空
throw new IllegalArgumentException("Target must not be null.");
}
if (!data.hasImage()) {//如果没有图片(uri是否为空,资源id为0)
picasso.cancelRequest(target);//取消请求
if (setPlaceholder) {
setPlaceholder(target, getPlaceholderDrawable());//设置占位图
}
return;
}
if (deferred) {//scale类型为fit
if (data.hasSize()) {//fit时不能使用resize
throw new IllegalStateException("Fit cannot be used with resize.");
}
int width = target.getWidth();
int height = target.getHeight();
if (width == 0 || height == 0) {
if (setPlaceholder) {//设置占位图
setPlaceholder(target, getPlaceholderDrawable());
}
picasso.defer(target, new DeferredRequestCreator(this, target, callback));//如果宽高有一个为0,自动算出宽高比
return;
}
data.resize(width, height);
}
//构建Request
Request request = createRequest(started);
//生成key
String requestKey = createKey(request);
//从内存中读取
if (shouldReadFromMemoryCache(memoryPolicy)) {
Bitmap bitmap = picasso.quickMemoryCacheCheck(requestKey);
if (bitmap != null) {
picasso.cancelRequest(target);//取消请求
setBitmap(target, picasso.context, bitmap, MEMORY, noFade, picasso.indicatorsEnabled);//设置bitmap
if (picasso.loggingEnabled) {
log(OWNER_MAIN, VERB_COMPLETED, request.plainId(), "from " + MEMORY);
}
if (callback != null) {
callback.onSuccess();
}
return;
}
}
if (setPlaceholder) {
setPlaceholder(target, getPlaceholderDrawable());
}
//内存没读到,就包装一个Action
Action action =
new ImageViewAction(picasso, target, request, memoryPolicy, networkPolicy, errorResId,
errorDrawable, requestKey, tag, callback, noFade);
//提交Action
picasso.enqueueAndSubmit(action);
}
方法有点长,不要急慢慢来,首先会检测Uri是否为空,如果空的话就取消请求。紧接着构建Request对象。1
2
3
4
5
6
7
8
9
10
11
12
13
14
15
16
17private Request createRequest(long started) {
int id = nextId.getAndIncrement();
Request request = data.build();
request.id = id;
request.started = started;
//省略了部分源码
Request transformed = picasso.transformRequest(request);
if (transformed != request) {
// If the request was changed, copy over the id and timestamp from the original.
transformed.id = id;
transformed.started = started;
//省略了部分源码
}
return transformed;
}
可以看出在createRequest里构建了Request对象,并给每一个request赋值了唯一的递增id。构建完Request之后根据Request生成一个key,如果可以从内存中读取就先从内存中读,读取到了就取消那个请求然后设置给ImageView。如果内存中没有读取到,最终会将原本的Request和RequestCreator中的属性包装为一个Action对象提交到队列中去。ImageViewAction继承于Action,Action的源码如下,此外Action还有三个主要的回调方法complete,error和cancel。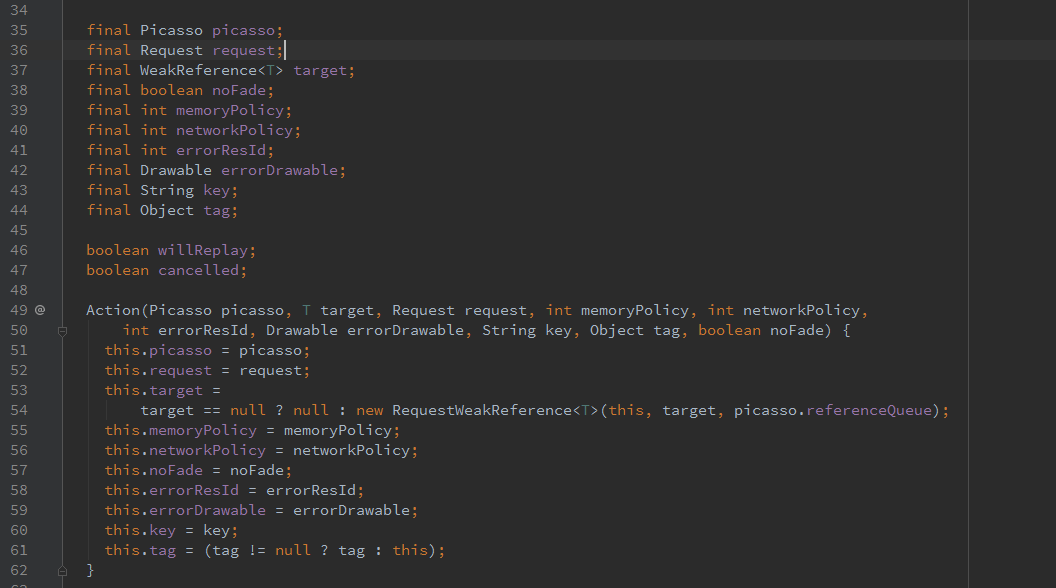
我们知道,最终会通过picasso.enqueueAndSubmit(action);来提交请求。那么picasso.enqueueAndSubmit(action);做了什么呢?源码在Picasso.java中,如下1
2
3
4
5
6
7
8
9
10
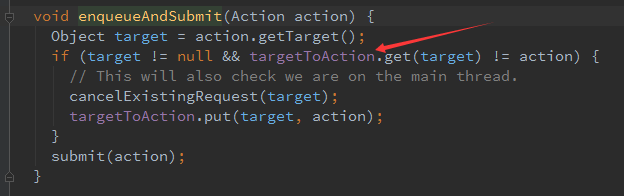
11void enqueueAndSubmit(Action action) {
Object target = action.getTarget();//获取target,一般为view
if (target != null && targetToAction.get(target) != action) {
// targetToAction为一个map集合,一个target一个action
//如果target已经存在一个任务,直接取消那个任务,执行新任务
cancelExistingRequest(target);
//然后把新任务放入map中
targetToAction.put(target, action);
}
submit(action);//提交新任务
}
一般第一次提交会直接走submit(action)提交任务,我们暂时不要管取消,submit源码如下。1
2
3void submit(Action action) {
dispatcher.dispatchSubmit(action);//内部是个Handler发送消息
}
dispatchSubmit中由DispatcherHandler将action发送到子线程,继续跟踪源码,如下。1
2
3
4
5
6
7
8
9
10
11
12
13
14
15
16
17
18
19
20
21
22
23
24
25
26
27
28
29
30
31
32
33
34
35
36
37
38void performSubmit(Action action, boolean dismissFailed) {
if (pausedTags.contains(action.getTag())) {//根据tag判断是不是需要暂停
pausedActions.put(action.getTarget(), action);//放入暂停的map
if (action.getPicasso().loggingEnabled) {
log(OWNER_DISPATCHER, VERB_PAUSED, action.request.logId(),
"because tag '" + action.getTag() + "' is paused");
}
return;
}
BitmapHunter hunter = hunterMap.get(action.getKey());//获取这个任务是不是已经提交过了,避免重复提交
if (hunter != null) {
hunter.attach(action);
return;
}
if (service.isShutdown()) {
if (action.getPicasso().loggingEnabled) {
log(OWNER_DISPATCHER, VERB_IGNORED, action.request.logId(), "because shut down");
}
return;
}
//一般第一次会走这里,通过forRequest生成一个BitmapHunter(Runable)
hunter = forRequest(action.getPicasso(), this, cache, stats, action);
//提交runbale
hunter.future = service.submit(hunter);
//放入map中
hunterMap.put(action.getKey(), hunter);
if (dismissFailed) {
failedActions.remove(action.getTarget());
}
if (action.getPicasso().loggingEnabled) {
log(OWNER_DISPATCHER, VERB_ENQUEUED, action.request.logId());
}
}
生成BitmapHunter 的源码如下,BitmapHunter实现了Runable接口。1
2
3
4
5
6
7
8
9
10
11
12
13
14
15
16static BitmapHunter forRequest(Picasso picasso, Dispatcher dispatcher, Cache cache, Stats stats,
Action action) {
Request request = action.getRequest();
//可以处理的请求类型
List<RequestHandler> requestHandlers = picasso.getRequestHandlers();
//对列表进行循环
for (int i = 0, count = requestHandlers.size(); i < count; i++) {
RequestHandler requestHandler = requestHandlers.get(i);
if (requestHandler.canHandleRequest(request)) {//判断提交过来的uri是否可以被处理
return new BitmapHunter(picasso, dispatcher, cache, stats, action, requestHandler);
}
}
return new BitmapHunter(picasso, dispatcher, cache, stats, action, ERRORING_HANDLER);
}
BitmapHunter的构造方法如下。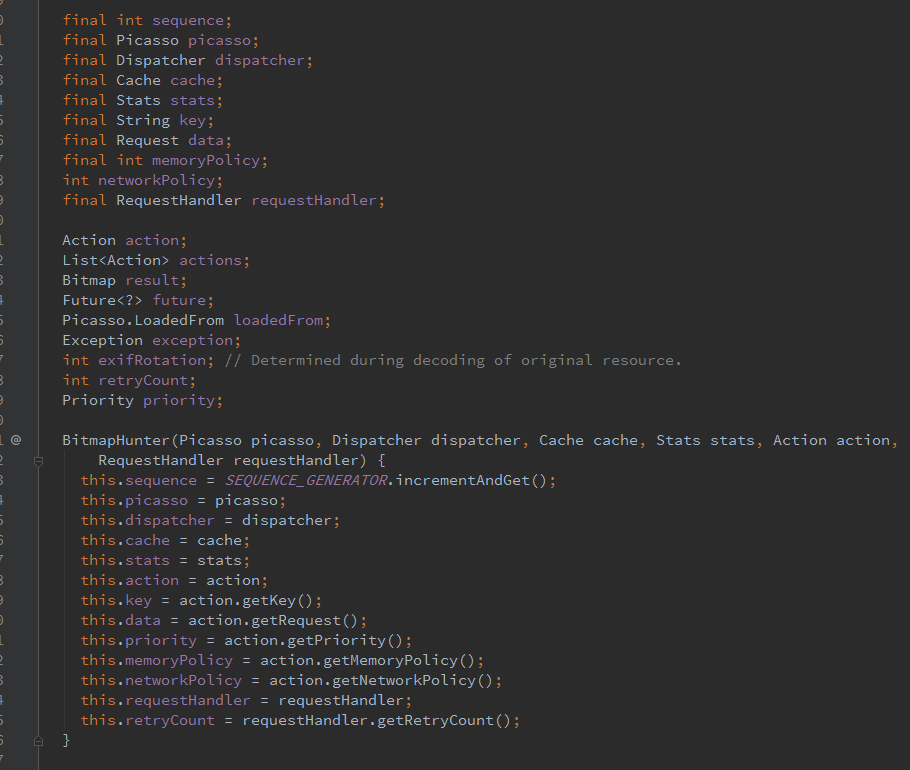
既然BitmapHunter实现了Runable接口,那么毋容置疑,接下来我们去看看run方法是怎么实现的。1
2
3
4
5
6
7
8
9
10
11
12
13
14
15
16
17
18
19
20
21
22
23
24
25
26
27
28
29
30
31
32
33
34
35
36
37
38
39
public void run() {
try {
updateThreadName(data);
if (picasso.loggingEnabled) {
log(OWNER_HUNTER, VERB_EXECUTING, getLogIdsForHunter(this));
}
result = hunt();//下载图片核心方法
if (result == null) {
dispatcher.dispatchFailed(this);
} else {
dispatcher.dispatchComplete(this);
}
} catch (Downloader.ResponseException e) {
if (!e.localCacheOnly || e.responseCode != 504) {
exception = e;
}
dispatcher.dispatchFailed(this);
} catch (NetworkRequestHandler.ContentLengthException e) {
exception = e;
dispatcher.dispatchRetry(this);
} catch (IOException e) {
exception = e;
dispatcher.dispatchRetry(this);
} catch (OutOfMemoryError e) {
StringWriter writer = new StringWriter();
stats.createSnapshot().dump(new PrintWriter(writer));
exception = new RuntimeException(writer.toString(), e);
dispatcher.dispatchFailed(this);
} catch (Exception e) {
exception = e;
dispatcher.dispatchFailed(this);
} finally {
Thread.currentThread().setName(Utils.THREAD_IDLE_NAME);
}
}
代码很长,但是核心的就result=hunt()这一句,其他的都是调度器(dispatcher)根据结果在分发任务。我们来看看这个核心方法。1
2
3
4
5
6
7
8
9
10
11
12
13
14
15
16
17
18
19
20
21
22
23
24
25
26
27
28
29
30
31
32
33
34
35
36
37
38
39
40
41
42
43
44
45
46
47
48
49
50
51
52
53
54
55
56
57
58
59
60
61
62
63
64
65 Bitmap hunt() throws IOException {
Bitmap bitmap = null;
if (shouldReadFromMemoryCache(memoryPolicy)) {
bitmap = cache.get(key);//首先从内存中取
if (bitmap != null) {
stats.dispatchCacheHit();
loadedFrom = MEMORY;
if (picasso.loggingEnabled) {
log(OWNER_HUNTER, VERB_DECODED, data.logId(), "from cache");
}
return bitmap;
}
}
data.networkPolicy = retryCount == 0 ? NetworkPolicy.OFFLINE.index : networkPolicy;
RequestHandler.Result result = requestHandler.load(data, networkPolicy);//然后根据请求处理去相应地方加载图片(网络,content,drawable等等)
if (result != null) {
loadedFrom = result.getLoadedFrom();
exifRotation = result.getExifOrientation();
bitmap = result.getBitmap();
// If there was no Bitmap then we need to decode it from the stream.
if (bitmap == null) {
InputStream is = result.getStream();
try {
bitmap = decodeStream(is, data);
} finally {
Utils.closeQuietly(is);
}
}
}
//如果bitmap不为空,进行处理
if (bitmap != null) {
if (picasso.loggingEnabled) {
log(OWNER_HUNTER, VERB_DECODED, data.logId());
}
stats.dispatchBitmapDecoded(bitmap);
if (data.needsTransformation() || exifRotation != 0) {
synchronized (DECODE_LOCK) {//同步锁,保证只能有一个bitmap被处理
if (data.needsMatrixTransform() || exifRotation != 0) {
//处理旋转,缩放等其他变换
bitmap = transformResult(data, bitmap, exifRotation);
if (picasso.loggingEnabled) {
log(OWNER_HUNTER, VERB_TRANSFORMED, data.logId());
}
}
if (data.hasCustomTransformations()) {
bitmap = applyCustomTransformations(data.transformations, bitmap);
if (picasso.loggingEnabled) {
log(OWNER_HUNTER, VERB_TRANSFORMED, data.logId(), "from custom transformations");
}
}
}
if (bitmap != null) {
stats.dispatchBitmapTransformed(bitmap);
}
}
}
//返回处理过后的bitmap
return bitmap;
}
处理请求结果
假如bitmap不为空,那么现在应该走 dispatcher.dispatchComplete(this);方法。1
2
3
4
5
6
7
8
9
10void performComplete(BitmapHunter hunter) {
if (shouldWriteToMemoryCache(hunter.getMemoryPolicy())) {
cache.set(hunter.getKey(), hunter.getResult());
}
hunterMap.remove(hunter.getKey());
batch(hunter);
if (hunter.getPicasso().loggingEnabled) {
log(OWNER_DISPATCHER, VERB_BATCHED, getLogIdsForHunter(hunter), "for completion");
}
}
经过batch方法后一番周转,最终会通过主线程的Handler回调到Action的complete方法中。
主线程的的Handler如下。1
2
3
4
5
6
7
8
9
10
11
12
13
14
15static final Handler HANDLER = new Handler(Looper.getMainLooper()) {
public void handleMessage(Message msg) {
switch (msg.what) {
case HUNTER_BATCH_COMPLETE: {
("unchecked") List<BitmapHunter> batch = (List<BitmapHunter>) msg.obj;
//noinspection ForLoopReplaceableByForEach
for (int i = 0, n = batch.size(); i < n; i++) {
BitmapHunter hunter = batch.get(i);
hunter.picasso.complete(hunter);
}
break;
}
//省略了部分源码
}
};
ImageViewAction中的complete源码如下。1
2
3
4
5
6
7
8
9
10
11
12
13
14
15
16
17
18
19 public void complete(Bitmap result, Picasso.LoadedFrom from) {
if (result == null) {
throw new AssertionError(
String.format("Attempted to complete action with no result!\n%s", this));
}
ImageView target = this.target.get();
if (target == null) {
return;
}
Context context = picasso.context;
boolean indicatorsEnabled = picasso.indicatorsEnabled;
PicassoDrawable.setBitmap(target, context, result, from, noFade, indicatorsEnabled);//设置图片
if (callback != null) {
callback.onSuccess();
}
}
到此为止Picasso的源码算是解读完了。
最后
- 怎么取消一个请求?
调用picasso.cancelRequest();即可,所有取消请求内部都会调用cancelExistingRequest(target);来取消任务,源码如下。1
2
3
4
5
6
7
8
9
10
11
12
13
14
15private void cancelExistingRequest(Object target) {
checkMain();
Action action = targetToAction.remove(target);//从map中移除
if (action != null) {
action.cancel();//取消任务。
dispatcher.dispatchCancel(action);//调度器分发取消
}
if (target instanceof ImageView) {
ImageView targetImageView = (ImageView) target;
DeferredRequestCreator deferredRequestCreator =
targetToDeferredRequestCreator.remove(targetImageView);//移除计算宽高
if (deferredRequestCreator != null) {
deferredRequestCreator.cancel();
}
}
Dispatcher中的执行取消的源码如下。1
2
3
4
5
6
7
8
9
10
11
12
13
14
15
16
17
18
19
20
21
22
23
24
25
26void performCancel(Action action) {
String key = action.getKey();
BitmapHunter hunter = hunterMap.get(key);
if (hunter != null) {
hunter.detach(action);
if (hunter.cancel()) {
hunterMap.remove(key);
if (action.getPicasso().loggingEnabled) {
log(OWNER_DISPATCHER, VERB_CANCELED, action.getRequest().logId());
}
}
}
if (pausedTags.contains(action.getTag())) {
pausedActions.remove(action.getTarget());
if (action.getPicasso().loggingEnabled) {
log(OWNER_DISPATCHER, VERB_CANCELED, action.getRequest().logId(),
"because paused request got canceled");
}
}
Action remove = failedActions.remove(action.getTarget());
if (remove != null && remove.getPicasso().loggingEnabled) {
log(OWNER_DISPATCHER, VERB_CANCELED, remove.getRequest().logId(), "from replaying");
}
}
内部是怎么判读并加载Drawable图片?
我们再来看一下Picasso的构造方法,看到没有,定义了一系列RequestHandler。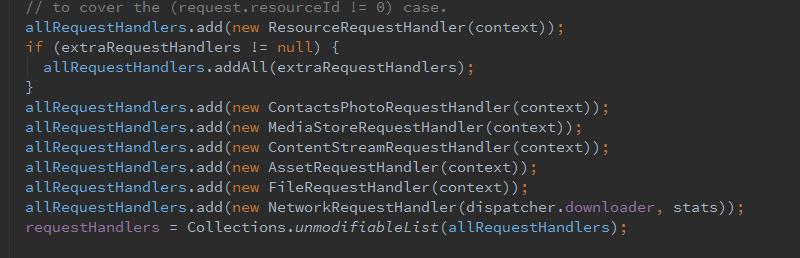
在forRequest中,会循环遍历属于那种类型,然后使用相应的加载方案。
该框架会对任何图片做磁盘缓存吗?
不会,如果允许,只会对网络图片进行磁盘缓存。除了NetWorkReqsutHandler,其他没有磁盘缓存功能。Picasso是怎么做到adapter中自动取消任务的?
其实靠的是ImageView的复用,一个View对应一个Action,当ImageView被复用就自动取消之前的任务执行新任务。